There are many console simulators on Android nowadays, especially arcade simulators. If you don't use the controller, you can't play it.
I originally had a USB controller on my computer. I bought more than ten bucks. After LeEr box arrived, I installed an arcade simulator on it. I plugged in the USB controller, and then set it up in the simulator. Can detect and set, but the arrow keys can not be set, a friend can set the direction, ordinary buttons can not be set.
So I searched the Internet and found a magical software. In theory, all USB controllers can be set (WIFI controller and Bluetooth controller support).
If your handle maps properly in the simulator, you don't need to look down.
First, hardware preparation:
Insert one of the two USB ports on the box, one with a USB mouse (wireless), this is a good setting.
Second, the software download:
I have uploaded the "USB/BT Joystick" setting software in the attachment
http://bbs.shafa.com/forum.php?mod=attachment&aid=MzI1ODExfGU5ODU0NTE3fDE0MzkzNzUxMDV8MjY3OTgyfDI2MjY0NQ%3D%3D (1.9 MB, Downloads: 0)
Third, the software use tutorial:
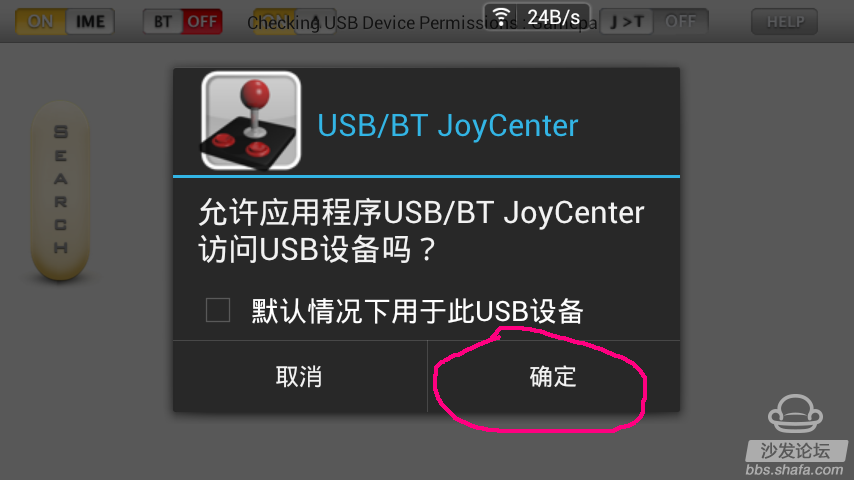
1. After installing this program on the LeTV box, click on the “Search Device†on the left, and click OK on the pop-up prompt box (be careful not to check the “Use this USB device by default†checkbox). After the application will recognize the gamepad connected to the phone, as shown:
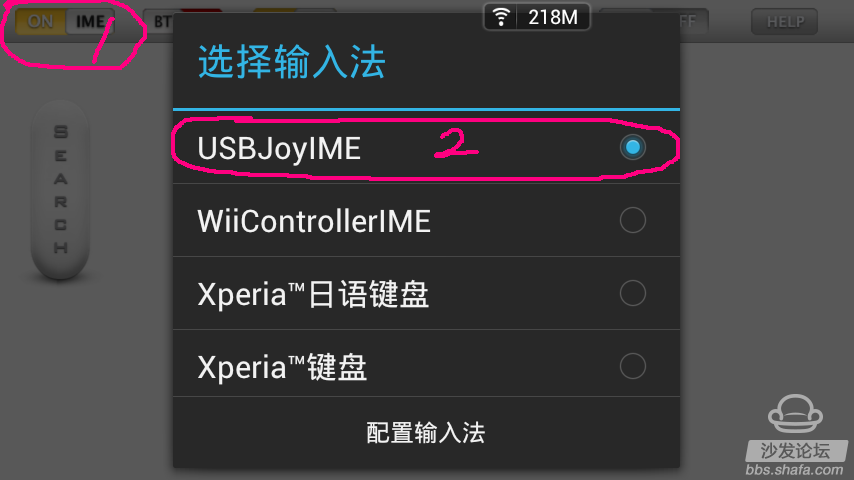
2, in the upper left corner of the software click the input method to switch to USBjoyIME, as shown
3, the handle of the big brand can directly find the key position, do not need you to set. If it is a handle without a brand, it needs to be set. The setting method is as follows:
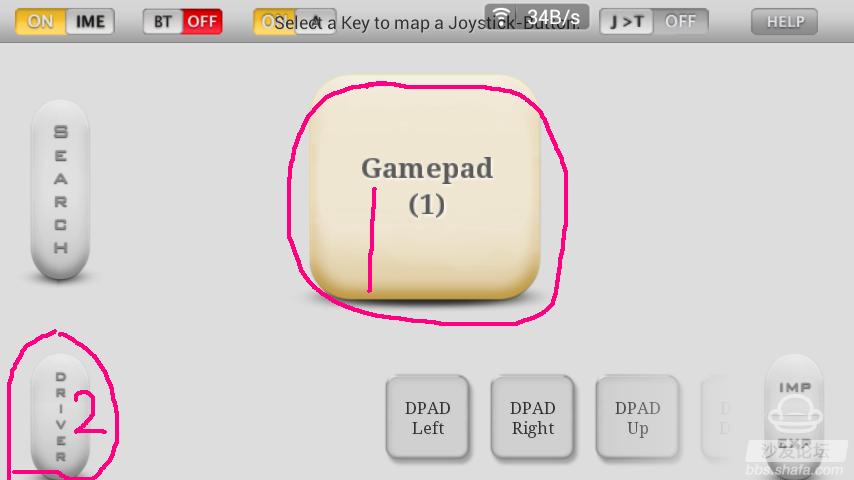
Click on the handle to identify the name (the position shown in Figure 1), and then click on the "create driver" (the position shown in Figure 2) in the lower left corner. Pictured:
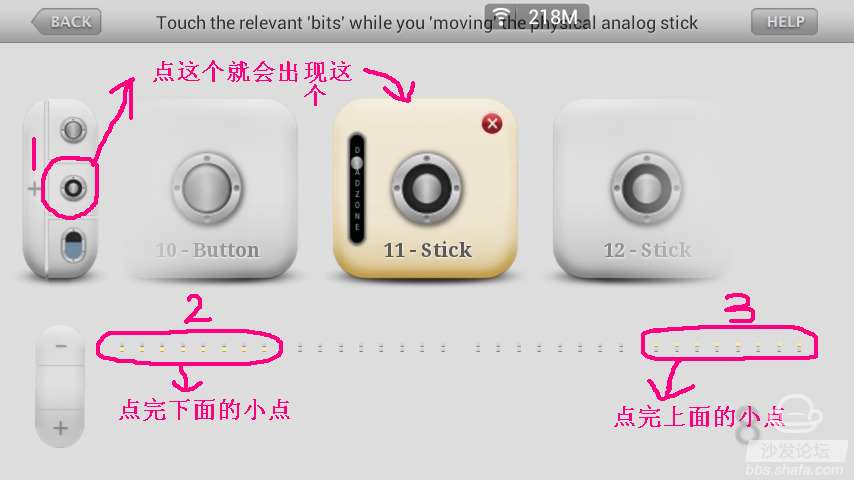
4, click in, there are add buttons and arrow keys in the upper left corner can be selected, we first add a button, as shown:
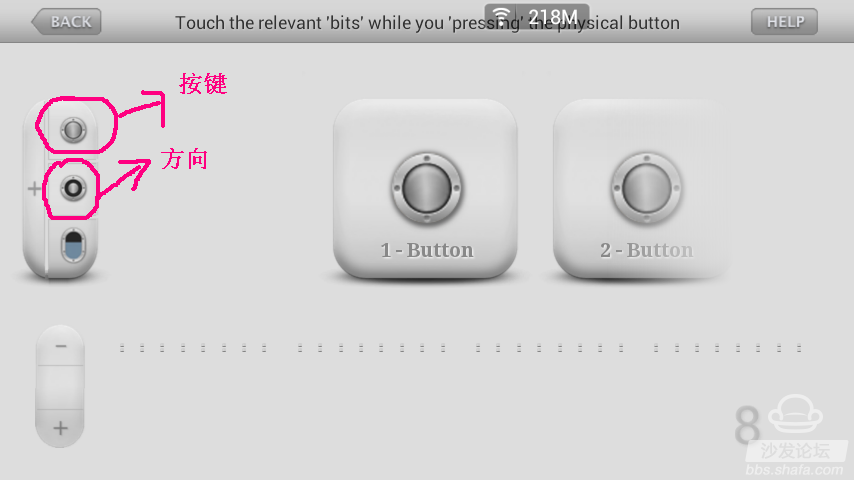
(1) Add button:
Clicking the button at the top left of the diagram will add a button that will be displayed in the middle of the screen so that you have several buttons on the handle to add a few buttons. After adding the button, click the first button with the mouse, then we first press the 1 button on the handle to see which of the following points have a reaction, after seeing the reaction point, we press and hold the 1 button on the handle, and then Point the mouse to the point of reaction (note that the upper and lower dots are separated, do not point two or more). After clicking it, it will feel a bit yellowish. Then release the 1 key on the handle. Then we have just The little dot will become a small yellow dot, as shown in the figure:

At this time, we have 1 button to complete, and then 2 button, we click on the second button above, then press the handle 2 button to see which of the following points respond (usually next to the 1 button button), After seeing which response has occurred, we hold down the 2 key. The method is the same as that of the 1 key. All the keys are set in turn (except the arrow keys and the joystick). If there is a situation where pressing the button on the handle and returning to the previous button after clicking the next button, click the red cross in the upper right corner of the button to delete the previously set button and add the button again.
(2) Add arrow keys:
It should be noted here that the setting of the arrow keys and the setting of the buttons are not the same. Setting method: Click the arrow button (add the following button below) in the upper left corner of the interface (We can click one, do not point so much, because one You can set all the direction keys), then you pick up the handle and press all the arrow keys up and down, right and left, the corresponding small points will respond, find the response in turn click with the mouse, (Note that do not need to hold down Handle direction keys, directly with your mouse click on it. This is different from the button). Follow the figure below to finish the two lines:
At this time, we press the handle's arrow key to see if the direction button above will move along with your arrow keys, indicating that the arrow keys are also set.
(3) Button pairing:
Now that we haven't finished yet, we go back to the previous interface and point your icon to the handle and then there is a bunch of key names below.
BCD UP and so on. Many ... as shown:
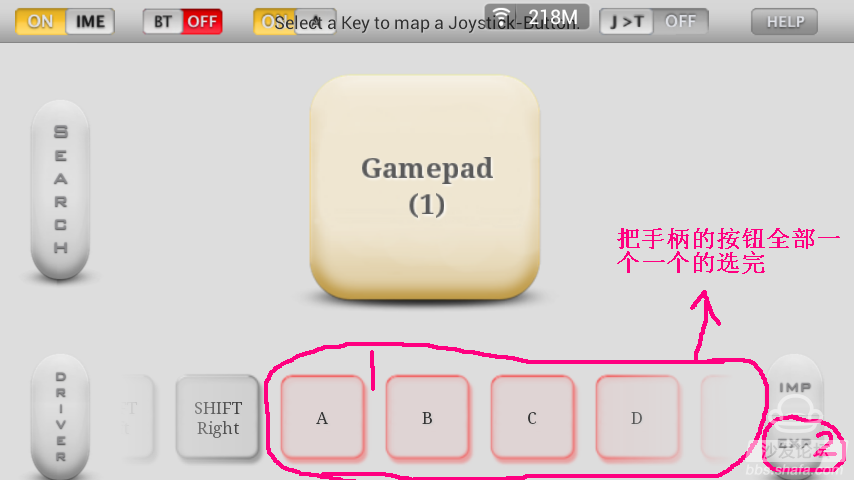
Let's click on a letter and press a handle button until all the keys on the handle are clicked. The arrow keys are the same. If successful, the letter will turn into a red box.
OK, here is the part of the software is set up, after exiting the program (without exiting the simulator set unsuccessful) and then open a console simulator.
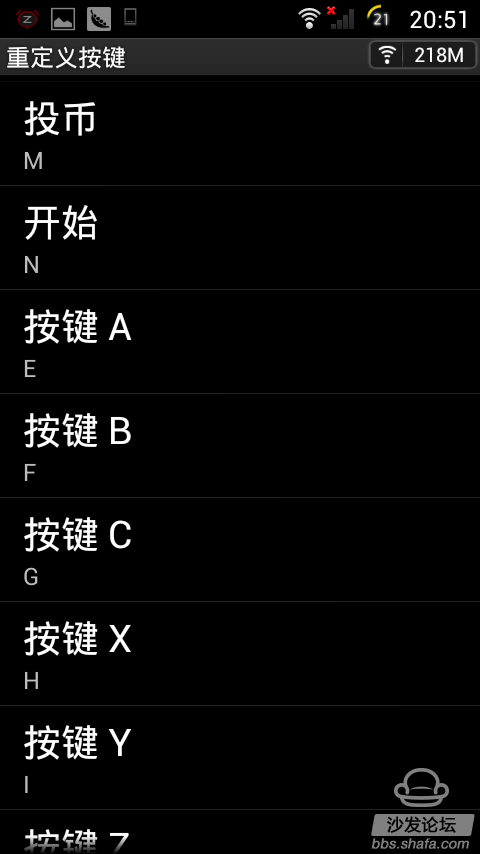
Fourth, the game console simulator settings:
In theory, what simulator can be set, enter the simulator - set - redefine the button, then we can set up. Pictured:
Supplement: In fact, this software has more powerful features, you can use the USB handle to map touch keys, so that the game with touch buttons can also play, I will not posted here, we can search for yourself.
I originally had a USB controller on my computer. I bought more than ten bucks. After LeEr box arrived, I installed an arcade simulator on it. I plugged in the USB controller, and then set it up in the simulator. Can detect and set, but the arrow keys can not be set, a friend can set the direction, ordinary buttons can not be set.
So I searched the Internet and found a magical software. In theory, all USB controllers can be set (WIFI controller and Bluetooth controller support).
If your handle maps properly in the simulator, you don't need to look down.
First, hardware preparation:
Insert one of the two USB ports on the box, one with a USB mouse (wireless), this is a good setting.
Second, the software download:
I have uploaded the "USB/BT Joystick" setting software in the attachment
http://bbs.shafa.com/forum.php?mod=attachment&aid=MzI1ODExfGU5ODU0NTE3fDE0MzkzNzUxMDV8MjY3OTgyfDI2MjY0NQ%3D%3D (1.9 MB, Downloads: 0)
Third, the software use tutorial:
1. After installing this program on the LeTV box, click on the “Search Device†on the left, and click OK on the pop-up prompt box (be careful not to check the “Use this USB device by default†checkbox). After the application will recognize the gamepad connected to the phone, as shown:
2, in the upper left corner of the software click the input method to switch to USBjoyIME, as shown
3, the handle of the big brand can directly find the key position, do not need you to set. If it is a handle without a brand, it needs to be set. The setting method is as follows:
Click on the handle to identify the name (the position shown in Figure 1), and then click on the "create driver" (the position shown in Figure 2) in the lower left corner. Pictured:
4, click in, there are add buttons and arrow keys in the upper left corner can be selected, we first add a button, as shown:
(1) Add button:
Clicking the button at the top left of the diagram will add a button that will be displayed in the middle of the screen so that you have several buttons on the handle to add a few buttons. After adding the button, click the first button with the mouse, then we first press the 1 button on the handle to see which of the following points have a reaction, after seeing the reaction point, we press and hold the 1 button on the handle, and then Point the mouse to the point of reaction (note that the upper and lower dots are separated, do not point two or more). After clicking it, it will feel a bit yellowish. Then release the 1 key on the handle. Then we have just The little dot will become a small yellow dot, as shown in the figure:
At this time, we have 1 button to complete, and then 2 button, we click on the second button above, then press the handle 2 button to see which of the following points respond (usually next to the 1 button button), After seeing which response has occurred, we hold down the 2 key. The method is the same as that of the 1 key. All the keys are set in turn (except the arrow keys and the joystick). If there is a situation where pressing the button on the handle and returning to the previous button after clicking the next button, click the red cross in the upper right corner of the button to delete the previously set button and add the button again.
(2) Add arrow keys:
It should be noted here that the setting of the arrow keys and the setting of the buttons are not the same. Setting method: Click the arrow button (add the following button below) in the upper left corner of the interface (We can click one, do not point so much, because one You can set all the direction keys), then you pick up the handle and press all the arrow keys up and down, right and left, the corresponding small points will respond, find the response in turn click with the mouse, (Note that do not need to hold down Handle direction keys, directly with your mouse click on it. This is different from the button). Follow the figure below to finish the two lines:
At this time, we press the handle's arrow key to see if the direction button above will move along with your arrow keys, indicating that the arrow keys are also set.
(3) Button pairing:
Now that we haven't finished yet, we go back to the previous interface and point your icon to the handle and then there is a bunch of key names below.
BCD UP and so on. Many ... as shown:
Let's click on a letter and press a handle button until all the keys on the handle are clicked. The arrow keys are the same. If successful, the letter will turn into a red box.
OK, here is the part of the software is set up, after exiting the program (without exiting the simulator set unsuccessful) and then open a console simulator.
Fourth, the game console simulator settings:
In theory, what simulator can be set, enter the simulator - set - redefine the button, then we can set up. Pictured:
Supplement: In fact, this software has more powerful features, you can use the USB handle to map touch keys, so that the game with touch buttons can also play, I will not posted here, we can search for yourself.